Friday, December 31, 2010

2011 Promises, Resolutions and Ideas

Pin It
There are the normal year end resolutions on my mind at this time of year, as usual. 

Lose weight.  Run more.  Stop drinking pop.  Get a job.  Pay off debt. 

Huh.  Well, we've all seen how those worked out last year...

So here is a realistic list of things that must be done this year instead.

Let's hope I get some of them done at least.

2011 Things To Do List:

  • Replace carpet in house
  • Pay off furniture (ugh)
  • Fix kitchen cabinet
  • Make new desk
  • Get rid of stuff in room (ugh!)
  • Re-paint basement
  • Fix basement bedroom walls (double ugh)
  • Clean out storage room
  • Have a garage sale (again, where does all this stuff come from!?!)
  • Paint/fix kitchen dings (damn ride on cars)
  • Pay off vacation
  • Sell car  (anyone want a '09 Smart Car for what we owe on it?!?! :)
  • Get Clayton driving lessons and his license
  • Move light in our closet
  • Put a new light in laundry room

I'm sure there are more.  This is a start at least.

May 2011 see this list crossed off! 

Oh, and if I could win the lottery, that'd be uber too.

Wednesday, December 22, 2010

Storm

Pin It
I should really start charging for her talent.

I opened my picture folder today to print out a few more tags and found these :


Wow.  How cute are those!

And we've already seen these ones:


All made on the basic Paint program, randomly, just because she felt like it.
 
I have one super talented, creative, amazing kid. 
 
Go Storm!

Tuesday, December 21, 2010

Our wish to you

Pin It
Merry Christmas Everyone!


We hope you all have an awesome and safe Christmas!


Wednesday, December 15, 2010

Gift Tags

Pin It
Today started out with me spotting some free gift tag printouts on the web. Which is better than how yesterday started, with the doorbell ringing, me stumbling out of bed bleary-eyed to face the by-law officer who would kindly like to remind me to move my van for street cleaning.  Awesome.

Anyways, we needed new gift tags this year for our re-usable cloth gift bags.  I usually use stickers or just cut out old cards and write on the back, but since I seen this free tag printout I thought I'd use those.  So I cut down some Christmas card stock so it would fit into my printer and then as I went to print them out I noticed all the little pictures Storm has drawn and saved to my computer lately.

The girl loves her some Paint. 

And I thought, hey I could print those out and make myself some tags!


Manny from Ice Age, Scooby Doo and a Christmas tree too!

So cute.

Then I spotted the picture file I have saved of Storm's name and words that describe her, that is waiting for me to paint for her room.  And I thought,  "hmm I should use Wordle and write out a bunch of words that describe all of the kids and print those out as tags too!"

Easily distracted and way-laid.  That's me.


And then I did this:


I mean, why not make them re-usable!  As I got started on this, I realized that I was down to my last two sheets of 8x11 laminating plastic.  But I had bought a mixture starter package on clearance at one point and it had a bunch of different sizes in it, including business card and luggage tag sizes.  So I just used up all the random sizes and then cut them down.  Plus I made sure to put one of each kid's names into a luggage tag so if they ever need one, they can just use these.


All the cutting.  Gah!


How cute are those?! 


Now, what was I really supposed to be doing today?!

Hmm.  A shower might be a good start.

Tuesday, December 14, 2010

Before and After

Pin It
I just stumbled across a picture of how the buffet looked when I bought it.

Thought I'd do a quick before and after post.

Before:


Broken door.  Missing glass.  Plastic red handles.  Weird middle door.  Ugly cowboy-style(?) painted design on remaining glass door.  Warped drawer bottom.  And it was honey gold.  Ew.

After:

 
Door fixed by the father-in-law.  (Thanks Gord!)  Glass replaced after much teeth gnashing and a few curse words.  New handles.  Middle door removed and different shelves put in.  New unwarped drawer bottom.  Drawers re-lined with fancy paper.  Thick ugly varnish stripped and fresh black paint applied.

I like.

Update on Buffet Doors

Pin It
They are done!

Whew.

I had Ryan measure out and draw an arch on the opposite side of the glass with a washable marker.  Then I leaded it.  And it turned out straight! Go me!


I really like the black outline.  I think that's part of what threw me off with just the frosting (well that and all the overspray and etched spots!)  But since my stencil was outlined in black as well, the plain frosting just looked a little blah.  So I guess this was an okay screw up in the end.  Also, they took way more clear frosting that I thought they would, so I had to make another trip to Michael's to buy more.

Here it is, fully assembled.


We have doors.  Holy crap.


Up close and personal.

Six months later, I have finally finished the never-ending buffet project.

Sunday, December 12, 2010

Buffet Doors Part Two? Three? Never ending?

Pin It
So, those doors.  The bane of my existence. 

I decided to try an $8 fix first before I spent the money on new glass.

Plus, you know I just couldn't let it go until I had attempted to salvage them.

So I decided to stain glass them.  The hope was to disguise the etched mess.  Turns out I actually like them better this way.  I like the black outline of the design now.


Here is one with the leading on.  I simply flipped the plexi over and used the old frosted design as a guide and piped on the leading. 

Then after it dried, I filled in the design with the clear frosting, which goes on white and dries semi-clear.  I also cleaned off all the old frosting on the other side.


Not looking so bad now!


However.

Oh yes, you knew there was a however

Up close you can still see this:


The frosting has dried, the old stuff removed from the other side, and you can still see where the combination of the sharpie and the lacquer frosting etched the glass.

Lovely.

So I'm going to pipe an arch around it and frost around the whole design.

First up:

Make your husband do the marking so that it is at least on there straight.


Hey, we've seen how I do straight.....

Saturday, December 11, 2010

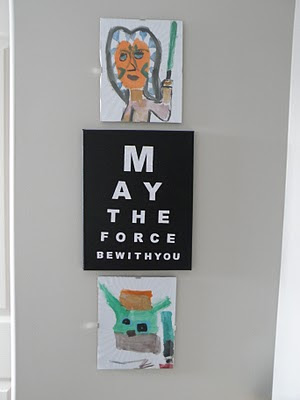
Star Wars Art

Pin It
I seen a few Star Wars eye charts floating around the web and I thought they would be perfect for the boy's Star Wars theme they have going on in their room.

I still have a few canvases left so I painted one of them black. 

Normally, I would paint the white letters on myself, but the inspiration piece I seen on the web had simply printed out letters on regular white paper and then Mod Podged onto the canvas.

Hmm.  Me and Mod Podge.  That can't possibly go wrong can it?!?

I just used a font I liked and then highlighted the background to print in grey and cut out all the letters.


Then after a lot of thought, and calculations and measuring and general wishing I had just used my projector to get the letters on my canvas, I had my art.


I think it's slightly crooked still.  Ah well.  The boys don't care.

Here it hanging on their wall, between Storm and Blade's paintings of Ahsoka and Yoda.


Ryan says art isn't supposed to be perfect.

Looks like I got that part right.

Friday, December 10, 2010

11 More

Pin It
Eleven more things to go before Spring!


One of which actually left my house already! Go me!

Thursday, December 9, 2010

Homemade Christmas Cards

Pin It
I'm leaving it a bit late this year.

Wait.  That's not just this year.  That's normal for me!

With all the painting I've been doing lately, I guess this idea was inevitable.  I decided that the kids should paint the 'cards' that I'm going to mail out. 

I bought some small canvases at the dollar store and painted the backgrounds for them.


I didn't bother sticking to traditional Christmas colors for the backgrounds.  Plus, I was testing out the new paint colors I just bought for Storm's word art for her room!  Multitasking people, multitasking!

Even Clayton painted two.

They got quite creative.  The only thing that had to be on the small canvas was fingerprinted snowmen.  The rest was up to them.


They turned out awesome! 


Ryan even painted one. Guess which one!


 I can't wait to mail them all out, which I better do soon, or they'll be New Year's cards instead!

Monday, December 6, 2010

Grandma's Advent Boxes

Pin It
Clever title no?

Ah well.

Here's the pictures.

Aren't they cute!

I made a mixture of boxes, filled them with some candy, and now she'll have something to look forward to as a countdown to Christmas.

I even sewed the ribbons to make the loop....which means that these are basically disposable boxes, but that's okay.  If I know Grandma, she'll open them as carefully as she can and save them for a while!

Saturday, December 4, 2010

Grandma's Ornaments

Pin It
As many or all of you know, this year is the first year my Grandma is in the Manor for Christmas.

When we moved her out of her house she got rid of all her Christmas stuff. 

My mom has bought her a new little tree for her room and some decorations to make it feel a little bit more like home.  She mentioned that maybe the kids could make Great Grandma some ornaments for the tree.

I grabbed some paper ornament directions off the internet.   We made a quick (ha!) trip to Michael's and bought some Christmas craft paper and some supplies and then headed to Mom's to craft.

This is what we came up with.


Mom also had printed out some pictures of the kids over the last year and made herself a few star ornaments for her tree.  There was pictures left over that she sent home with me, so I made some to hang on Grandma's tree.


In a haze of glue, I decided to make her some advent boxes too with little treats in them for her to countdown to Christmas with.

However, I ran out of ribbon and I can't post them half done!

Another trip to Michael's.   Oh darn.

Friday, December 3, 2010

Disappointment

Pin It
Utter, crushing disappointment.

That was what I was feeling the other night.  Boo.

We finally bought the plexi-glass for the buffet doors.  I finally got the buffet door painted! Go me.

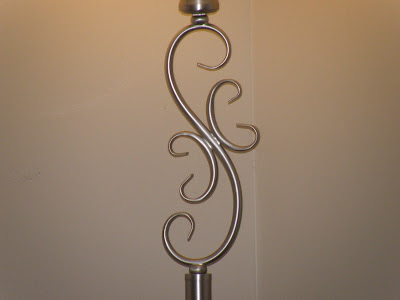
I wanted a design frosted into the glass, and had found some inspiration in the form of my floor lamp.


I traced it out, with the help of my mom holding the paper behind it.

Put the design on to some plastic. 


Ryan cut it all out carefully and put it on the glass.


I made him spray paint it too.  I'm too impatient for it, and he does it all the time at work anyways.


Waited for it to start "frosting"


I don't even want to show you the picture of it after we took the stencil off.

My original plan was just to fix it some how, some way, or just start again and then show you the buffet finally done.

However.  I'll share my pain.

Even Rodeo can't bear to look.

Okay, so from a distance, and if you're farsighted, nearsighted or have your eyes closed, they don't look bad.  They almost look like what I wanted.

Here's the ugly close-up.

Let's just not talk about it.

Yes, I bought laquer thinner.
Yes, I tried to fix this mess.

No, it didn't work. Gah!  That's all I have to say.

I've decided that how this story ends, in the end, will be better and more epic than this anyways.

So all will be good.  Eventually.

Thursday, December 2, 2010

The Smell

Pin It
We have a stink in our kitchen.

It seems to have came out of nowhere. 

You don't want to bend down in front of our sink.

Here's what it looked like on Saturday morning.


So, this horrible smell was hard to track down.  The cabinet didn't stink.  None of the stuff under there stank.  The pea trap didn't stink.  That's what we originally thought was the culprit. 

A little while ago, the right sink stopped working right.  Out of the blue, the plug no longer kept the water in.  Yet no water was escaping into the cabinet.  So weird. 

Turns out, this sink has some sort of safety fitting on it, that allows the water to still go into the pipes even if the gasket or drain part isn't working right. Handy that.

Oh, and the smell?  Coming from a disintegrating custom order gasket that can not be found in town or in the city and can not be successfully cleansed of the smell of sewer no matter what chemical or homegrown treatment you throw at it.

That rocks.

Next up:  Ryan builds his own gasket.

Wednesday, December 1, 2010

Indecision

Pin It

My new love/hate website.

I could hit Randomize for hours, trying to find just the perfect layout of words and fonts.  I think I was literally driving myself a little bonkers. 

I know, I know, I'm already there, no need to go farther! 

I was attempting a new layout for a matching painting to go beside my Sweet Family painting I did last week.  Eventually, I pried my mouse away from the randomize button, with about 8 layouts I couldn't seem to decide between.  I sent a desperate shout-out by email to a bunch of friends.  We narrowed it down to this one:

Sorry to all my friends!

And then I went downstairs to put it on the projector, and on the canvas, only to find out that the font was just TOO small!!  O M G. 

Instead of driving my friends bonkers as well, I just went back to Wordle solo and hit random a few more zillion times, making sure my words were big enough and I ended up with a similar font as the other painting.

I was aiming for a big S on one side, with a list of S words that describe our family on the other side.  I couldn't get the S big enough for me, so I ended up doing two separate pictures.  One of a S solo, and one of all the S words. 

Yeah, I should have just done that to begin with.  Nothing like taking the long hard road....


And then came the painting, and the squinting, and the cramping of fingers and arms.


I made sure to have more white colored words this time.

Here it is next to the other one.


Finally. 

Finally, that wall doesn't look so bare any more.  I'd show you the rest of that wall, but that would mean I would have to clean.......and I have Christmas crafts to make.

Screw cleaning.