Thursday, September 9, 2010

The Buffet

Pin It
Okay.  So I don't have the buffet totally done to where I'm happy with it. 

BUT I do have it painted and in the house.  So I thought I'd update the pictures for it.

A before picture to remind you:


There she is, in all her glory.  Ugly plastic red handles, questionable paint on glass doors, honey varnish all over.  Not to mention:  wonky drawers with warped bottoms, weird middle door, and a missing glass door on the right, with only 3 out of 4 wood pieces to rebuild the door out of.

First off, get that varnish off of it!  Sure my FIL nearly had a heart attack when I said I planned on painting it, but my house is  mahogany..not honey oak from the 60s. 

Out to the backyard, armed with supplies!
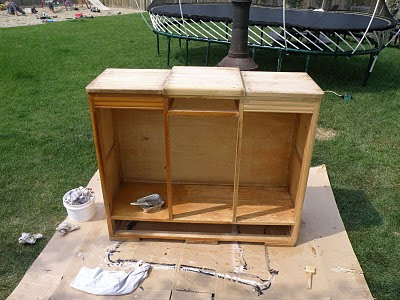
Mid-removal.


I have to say, removing the varnish was a breeze.


After I had it all off, and scuffed clean, it was time for remodelling! 

I didn't like that it was two long shelves inside of it.  I hated that middle door.  Oh, Ryan! Fix please!


We bought some pine shelving from HD and Ryan cut them down to fit vertically into the buffet, making three separate areas instead of one big one.  He added new supports for the shelving, making the left side have two shelves and the right side have three.

Ready to paint.


Have you ever painted the inside of a cupboard black?  If you start in the middle of the piece and work out to the edges, I swear it's like painting all the happiness out of the world.  Wonder if JKR was painting a small space black when she was thinking of how to describe dementors...  Anyhow, it gets really, really hard to see where you haven't painted yet if you start in the middle first.  Do all the edges and corners first, then continue to paint away the happiness.  I also painted in spots no one will ever see unless they decide to stand on their heads and look way way up into the buffet.  Fun. 

I have to say, I love it black. I went to HD and bought some really nice handles for $13 each (ouch!).  We repurposed the two long shelves and cut them to make the three smaller shelves.  Bought a new skinny backboard piece for the bottom drawer.  Now we are awaiting the re-made door from the FIL and glass needs to be cut and bought for the doors as well.  But I thought I'd get it up and on here for you to see at least some progress on it!


TADA!


Please ignore the messy stack of newspapers and flyers!! :)

Wednesday, September 8, 2010

Ground Cover

Pin It


The grass on the side of our house never does great right close to the house.

Why, I don't know.  Too hot and too much drainage if I had to guess. 

This year I thought I'd take advantage of the dead spots and plant some sunflowers and pumpkins there. 
I figured if nothing else, I wouldn't have to mow!

And....success!


(a small windstorm resulted in the plants bending over
and almost touching the ground! so we rigged up some white
twine and tied them back, hence why some of them look
 like they are trying to escape to the underground!!)


 The sunflowers are at least 8 feet high.

 The pumpkins sprawled everywhere, attaching to the ground literally with vines.

 We have a pumpkin!

A few smaller ones too!


The only thing now is, with fall coming on, I have to remember to go out and cover up the plants.

Tuesday, September 7, 2010

Welcome to my CRIB

Pin It
Literally.


Ok, not really.  But that was my initial feeling after we installed the new hand railing on our front step.

For those who don't know, my grandma recently moved in with us, while she awaits a room at the lodge.

Our lot has kindly sank around the house.  It's our own little sink hole! Woot! 

Anyways.  It resulted in our sidewalk dropping 3 inches over 6 years, but not our cement step.  The step is connected to the house.  Step stayed stationary, sidewalk dropped.

Nice.

Anywho, back to the fascinating story of my new crib. 

Grandma needed a railing to get down the steps (esp as the last step was turning out to be a BIG one).  We were alright going up and down but not so much 84 year old knees and declining balance. 

So we went to Totem. I picked out a railing.  Ryan spent a frustrating day and a half fighting rain, broken drill bits, shoddy instructions (and the lack of them), multiple trips back to the hardware store just to get this easy 1-2-3 railing up!  Okay, in defense of this actually very lovely railing, it would have been as easy as 1-2-3 installed on to a wood step.  Into a cement step with rocks in the concrete, not so much. And since we were only going down one step, because we didn't want to attach to the sinking sidewalk, it was a pretty steep and short incline for the railing which sort of null and voided the instructions on where to put the top and bottom rails. 

Ryan is glad it is done. Enough said.

Here's a look from the front.


Don't mind the sinking sidewalk!


Now the question on my mind is...should we put another rail on the opposite side??

I'm not in love with the railing.  Mostly because I don't want to be.  We have never wished we had a railing in the 6 years we have lived here.  I still didn't wish for one. 

Waah waah cry cry.

I know.
 
I'm over it. 

Truly.